这篇文章上次修改于 599 天前,可能其部分内容已经发生变化,如有疑问可询问作者。
前言
因为准备期末考试了,所以我们教前端的老师不小心”泄露“了一丢丢题库出来

在题目里我看到了有一个 vue 的轮播图
这玩意我们没有学过,但是我们学 HTML5 的时候学过一个轮播图
我就想能不能把 HTML 的轮播图套到 Vue 里面
然后忙活了很久发现我居然不会。见笑了
实现
然后我就开始我的找代码教程
搜索引擎所搜索到的要不就是陈年屎山代码
要么就是 HTML 写的轮播图
还有的还是本地引入 vue.js 的写法也类似 HTML
PS:我们学的是 Vue 脚手架搭建不是引入 js 文件
最后经过我不屑的 Ctrl+C 和 Ctrl+V,终于在一堆屎山中找出了可以一些可以使用的代码
代码
经过我那一点点的 vue 和 html 的知识最终将这代码(三坨新屎山代码)

改成了可以使用的代码
分为两个代码,代码一为自用代码须对 vue 以及 js 有一定基础自己改动才可使用
代码二和代码三则是完全复制粘贴即可使用,看你们喜欢使用那个
代码一
下面是我自用的懂的自己用吧
1
2
3
4
5
6
7
8
9
10
11
12
13
14
15
16
17
18
19
20
21
22
23
24
25
26
27
28
29
30
31
32
33
34
35
36
37
38
39
40
41
42
43
44
45
46
47
48
49
50
51
52
53
54
55
56
57
58
59
60
61
62
63
| <template>
<div id="app">
<div style="display: flex; justify-content: space-between">
<div style="width: 70%">
<div style="width: 100%; max-width: 800px; margin: 20px auto 0 auto">
<el-carousel
:interval="2300"
arrow="always"
indicator-position="none"
trigger="hover"
>
<el-carousel-item v-for="(item, index) in imageList" :key="index">
<img
:src="item.image"
alt=""
style="width: 100%; max-height: 360px; object-fit: cover"
/>
<div class="ziti">
<h3>{{ item.title }}</h3>
<p>{{ item.description }}</p>
</div>
</el-carousel-item>
</el-carousel>
</div>
</div>
</div>
</div>
</template>
<script>
export default {
name: "app",
data() {
return {
imageList: [
{
title: "标题",
description: "介绍",
image: "图片地址",
},
{
title: "标题",
description: "介绍",
image: "图片地址",
},
//更多图片依次
],
};
},
};
</script>
<style scoped>
.ziti {
position: absolute;
bottom: 10px;
left: 10px;
color: rgb(223, 35, 123);
background-color: rgba(255, 255, 255, 0.33);
padding: 10px;
border-radius: 5px;
}
</style>
|
代码二
这个是经过我修改后也可直接食用(直接复制粘贴)
1
2
3
4
5
6
7
8
9
10
11
12
13
14
15
16
17
18
19
20
21
22
23
24
25
26
27
28
29
30
31
32
33
34
35
36
37
38
39
40
41
42
43
44
45
46
47
48
49
50
51
52
53
54
55
56
57
58
59
60
61
62
63
64
65
66
67
68
69
70
71
72
73
74
75
76
77
78
79
80
81
82
83
84
85
86
87
88
89
90
91
92
93
94
95
96
97
98
99
100
101
102
103
104
105
106
107
108
109
110
111
112
113
114
115
116
117
118
119
120
121
122
123
124
125
126
127
128
129
130
131
132
133
134
135
136
137
138
139
140
141
142
143
144
145
146
147
148
149
150
151
152
153
154
155
156
157
158
159
160
161
162
163
164
165
166
167
168
169
170
171
172
173
174
| <template>
<div class="showImg">
<img
@mouseover="changeInterval(true)"
@mouseleave="changeInterval(false)"
v-for="item in imgArr"
:key="item.id"
:src="item.url"
alt="暂无图片"
v-show="item.id === currentIndex"
/>
<div @click="clickIcon('up')" class="iconDiv icon-left">
<i class="el-icon-caret-left"></i>
</div>
<div @click="clickIcon('down')" class="iconDiv icon-right">
<i class="el-icon-caret-right"></i>
</div>
<div class="banner-circle">
<ul>
<li
@click="changeImg(item.id)"
v-for="item in imgArr"
:key="item.id"
:class="item.id === currentIndex ? 'active' : ''"
></li>
</ul>
</div>
</div>
</template>
<script>
export default {
name: "app",
data() {
return {
currentIndex: 0,
timer: null,
imgArr: [
{
id: 0,
url: require("图片路径"),
},
{
id: 1,
url: require("图片路径"),
},
//下面依次如上
],
};
},
methods: {
startInterval() {
clearInterval(this.timer);
this.timer = setInterval(() => {
this.currentIndex++;
if (this.currentIndex > this.imgArr.length - 1) {
this.currentIndex = 0;
}
}, 2300);
},
clickIcon(val) {
if (val === "down") {
this.currentIndex++;
if (this.currentIndex === this.imgArr.length) {
this.currentIndex = 0;
}
} else {
if (this.currentIndex === 0) {
this.currentIndex = this.imgArr.length;
}
this.currentIndex--;
}
},
changeImg(index) {
this.currentIndex = index;
},
changeInterval(val) {
if (val) {
clearInterval(this.timer);
} else {
this.startInterval();
}
},
},
mounted() {
this.startInterval();
},
};
</script>
<style scoped>
* {
padding: 0;
margin: 0;
}
li {
list-style-type: none;
}
.showImg {
position: relative;
width: 40%;
height: 250px;
margin: 100px auto;
overflow: hidden;
}
.showImg img {
width: 100%;
height: 100%;
}
.iconDiv {
position: absolute;
top: 50%;
transform: translateY(-50%);
width: 30px;
height: 30px;
border: 1px solid #666;
border-radius: 15px;
background-color: rgba(125, 125, 125, 0.2);
line-height: 30px;
text-align: center;
font-size: 25px;
cursor: pointer;
}
.iconDiv:hover {
background-color: white;
}
.icon-left {
left: 10px;
}
.icon-right {
right: 10px;
}
.banner-circle {
position: absolute;
bottom: 0;
width: 100%;
height: 20px;
}
.banner-circle ul {
margin: 0 50px;
height: 100%;
text-align: right;
}
.banner-circle ul li {
display: inline-block;
width: 14px;
height: 14px;
margin: 0 5px;
border-radius: 7px;
background-color: rgba(125, 125, 125, 0.8);
cursor: pointer;
}
.active {
background-color: black !important;
}
</style>
|
代码三
这个代码三也是可以直接食用(复制粘贴即可)
1
2
3
4
5
6
7
8
9
10
11
12
13
14
15
16
17
18
19
20
21
22
23
24
25
26
27
28
29
30
31
32
33
34
35
36
37
38
39
40
41
42
43
44
45
46
47
48
49
50
51
52
53
54
55
56
57
58
59
60
| <template>
<div>
<el-carousel
:interval="2300"
height="36rem"
@change="changeImg"
indicator-position="outside"
>
<el-carousel-item v-for="(item, index) in images" :key="index">
<el-image
:class="className"
style="width: 100%; height: 100%"
:src="item.idView"
fit="fit"
></el-image>
</el-carousel-item>
</el-carousel>
</div>
</template>
<script>
export default {
name: "Index",
data() {
return {
images: [
{ id: 0, idView: require("图片路径") },
{ id: 1, idView: require("图片路径") },
//更多图片依次
],
className: "",
};
},
mounted() {
this.className = "lun-img-two";
setTimeout(() => {
this.className = "lun-img";
}, 300);
},
methods: {
changeImg: function (e) {
this.className = "lun-img-two";
setTimeout(() => {
this.className = "lun-img";
}, 300);
},
},
};
</script>
<style scoped>
.lun-img {
transition: all 4s;
transform: scale(1.5);
}
.lun-img-two {
transform: scale(1);
}
.el-carousel__item.is-animating {
transition: transform 1s ease-in-out;
}
</style>
|
最终样式是这样子
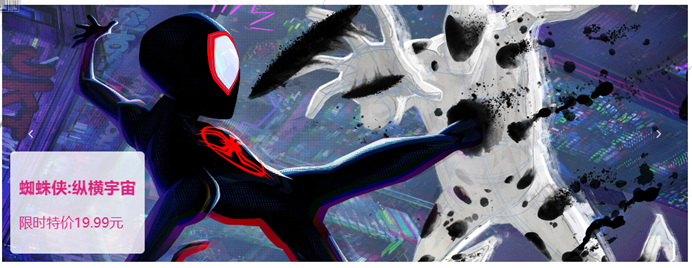
自用的效果
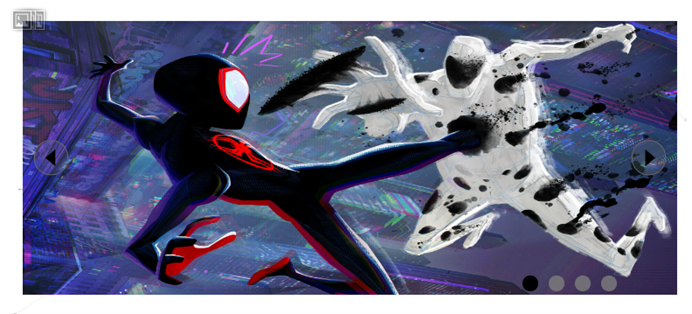
修改的代码二效果
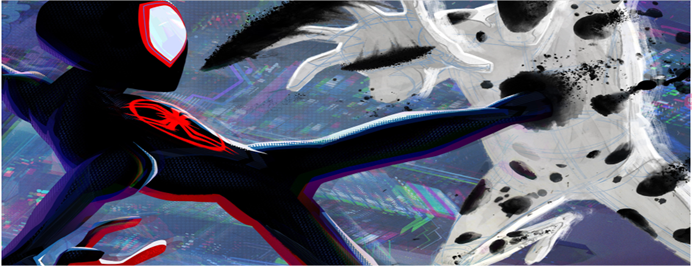
代码三的效果 跟代码一差不多,增加一个花里胡哨的缩放动画
左右两个箭头可以调整图片轮播,默认 2.3s(Ps:三个代码都是) 自动轮播一次
总结
其实这个轮播图还是挺简单的,但是由于本人技术有限没能靠自己写出来
最后还是靠 Ctrl+C 和 Ctrl+V 写出来的
但是多了解一些 js 语法和 vue 的语法应该就可以完成了

Frost
恨君不似江楼月,南北东西,南北东西,只有相随无别离。
如本站内容对你有所帮助的话,不妨 捐助支持 一下?